Thursday, 13 August 2015

Virtualbox 5.0 and Yosemite 10.10.1

sAt last after long time this happen running OS X on VirtualBox, not without off a lot of f....k.
But this post is not about how to install OS X on VirtualBox but how you can access host share folder without guest addictions.
Well if you need help on that this is a good place for start...
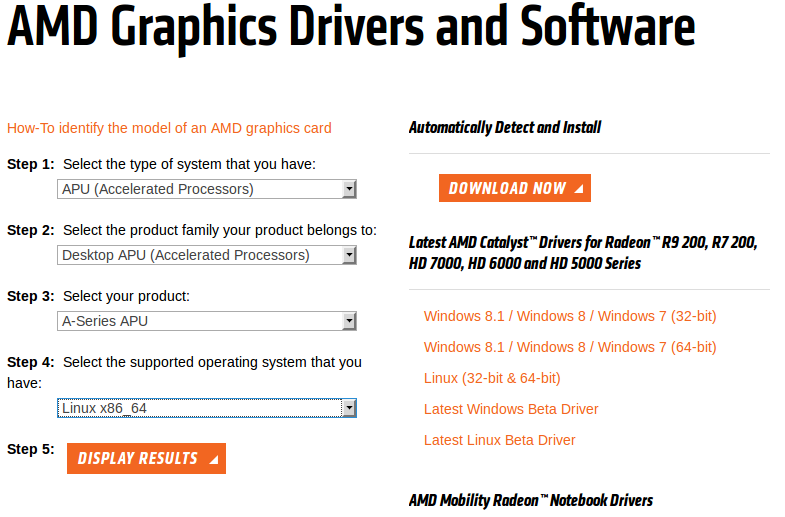
 http://www.macbreaker.com/2015/01/virtualbox-yosemite-zone.html
My system that I try this is Ubuntu 15.04 as host and VirtualBox 5.0, the guest OS X Yosemite 10.10.1, running AMD Apu.


 kernel 3.19.0-23


my system is up to date and VirtualBox 5.0 was a .deb file from Oracle.

The Yosemite inside VirtualBox,


So how to share a folder from host?

We will use smb to get this files on virtual machine, from VirtualBox forum...
Until there is Guest Additions for Mac OS X, you can still share folders on the host with the guest via the network. It is pretty simple:

1) Share a folder from the actual host machine (from the OS itself, not through the vbox shared folders settings)
2) Use NAT for your guest's network settings
3) From Mac OS X, Open "Finder" (looks like a square face, usually on the bottom-left)
4) From the top menu, navigate to Go->Connect to Server
5) For "Server Address" enter smb://10.0.2.2
6) Click "Connect"
7) Enter your username and password (for the host machine)
8) Select the shared folder from the list

This is the method I am using in my Mac OS X guests until the new Guest Additions is implemented.
by paulscode

How to Access Host's Shared Folder from MacOSX Guest

From help.ubuntu.com, open terminal and input one at time

sudo apt-get update
 
sudo apt-get install samba
 
 
if samba is installed terminal will tell you that is installed and the newest,


create a samba password, I have used my root password but is up to you,


sudo smbpasswd -a your-user-name

and it look like,

""sudo smbpasswd -a sony""

Make a folder for share

mkdir /home/your-user-name/folder-name

user name the same as your login and folder name "Yosemite"? maybe.

Backup your smb.conf,

sudo cp /etc/samba/smb.conf ~

and now edit smb.conf

sudo nano /etc/samba/smb.conf

to save the edited file ( ctrl+x ) you will be asked if you want to save your changes, press ( y ) for yes, or trick part ""sudo  nautilus"" navigate to /etc/samba/smb.conf and edit and save the file from there as root.

What to edit in this file, is more add... to the end of the file

[Yosemite]
path = /home/your-user-name/Yosemite
available = yes
valid users = your-user-name>
read only = no
browseable = yes
public = yes
writable = yes
restart samba

sudo service smbd restart

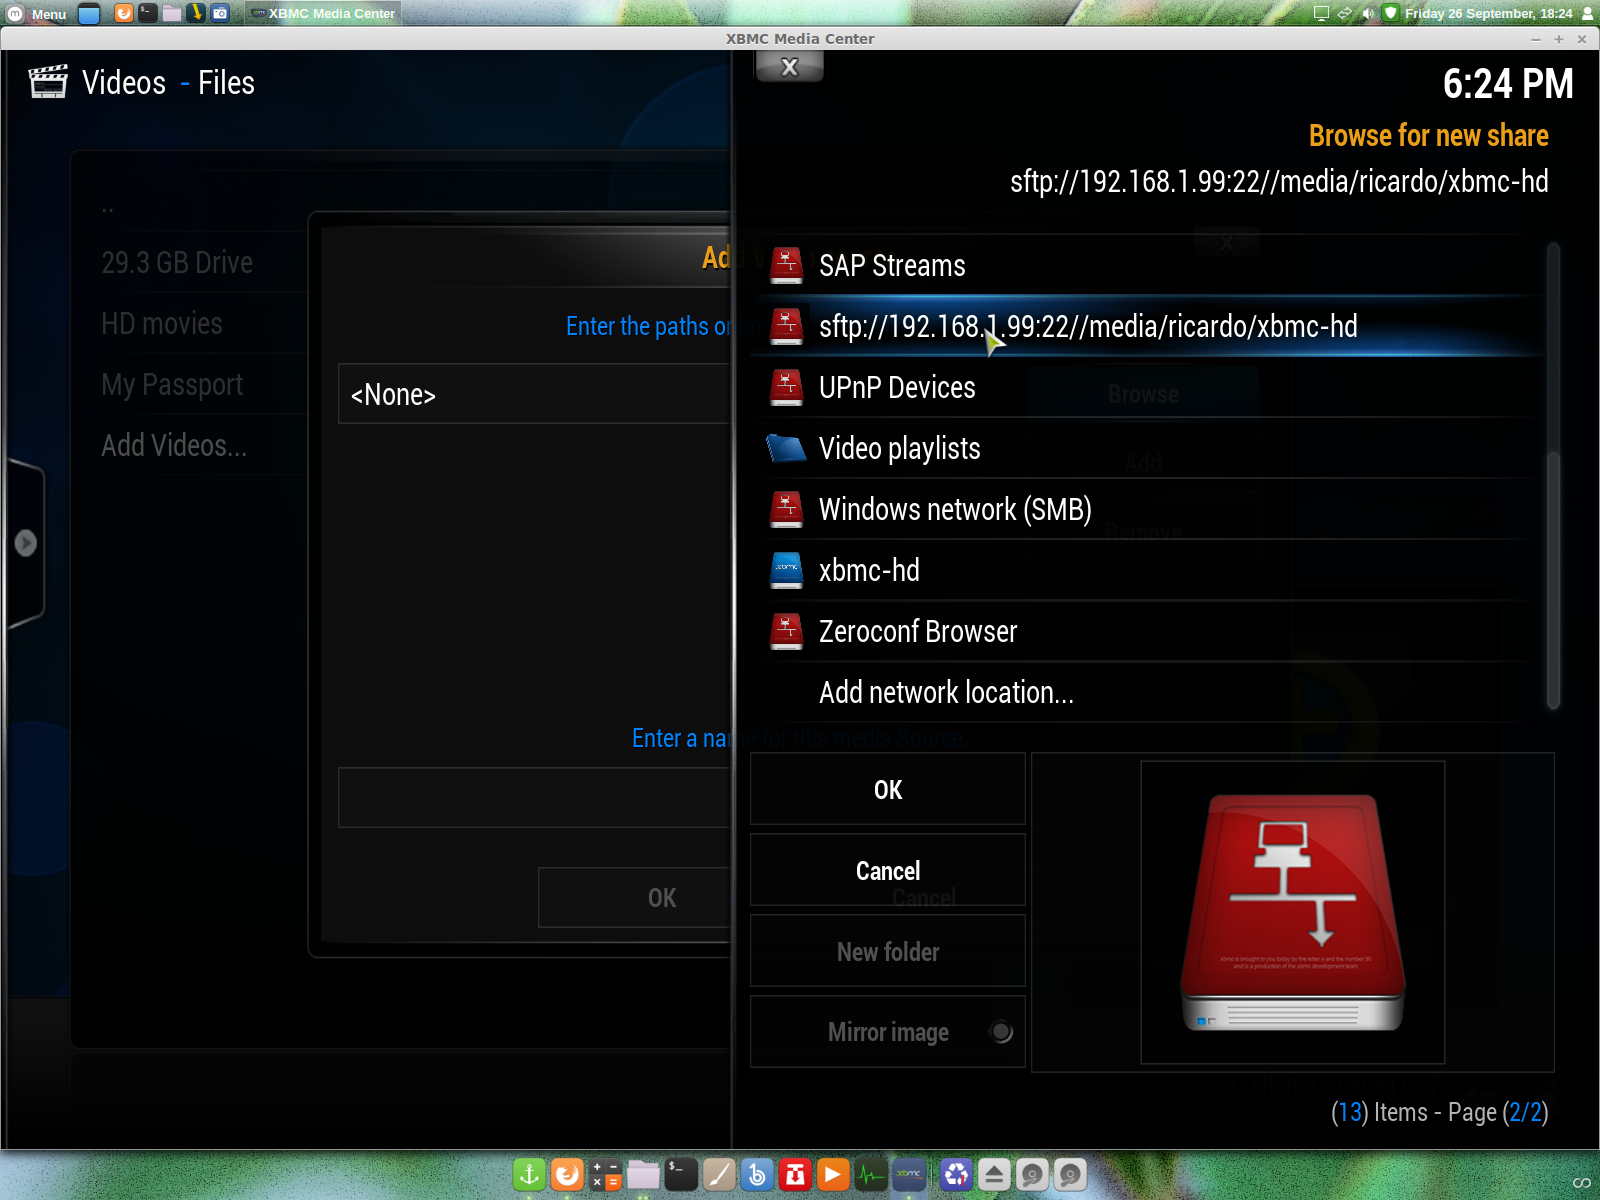
and back to VirtualBox to access the samba share folder


in finder  go to go and connect to server


and input smb://10.0.2.2, this is the address of your host


and input your-user-name and password.

Thanks to the original bloggers for all the info, and please visit there’s  sites.

Wednesday, 1 October 2014

Cpufreq not show on panel Mint 17 a fix

Indicator-cpufreq on my Mint 17 is install and working but for some reason not show on Mint panel, see launchpad.net latest bugs reported.

            Until this bugs are fixed my fix..
 you can star it with
ALT+F2 and type  "indicator-cpufreq"

or

add a launcher in or desktop..


                                       ALT+F2 and type [indicator-cpufreq]


                           right click on your desktop and add a launcher


                             type the info for the launcher and add a icon


I hope this help.

Friday, 26 September 2014

Stream Your Files Over The House

Hi this is a kind of tutorial, some hardware, software is need for this "kind of tutorial".


      To begin let me tell about my set up, two box running Linux Mint 17 64bit, one on my living room and the other on my small room they are connected directly to my Thomson  wi-fi router with RJ45 cables with help of TP-LINK AV200+, on the living room side, together this two machines have 7 TB of HDD.

Things that you need for this "kind of tutorial"

            Linux Mint 17 or any other based in Ubuntu/Debian
            OpenSSH Client (install by default in Mint)
            OpenSSH Server
            XBMC 13.2            (Kodi from 14.0)
  
Ok I have this new board that was 8 Sata ports so I only need 1 box running and something like Raspberry  Py with Raspbian on the living room to stream to my TV.

Stream Your Files Over The House

 So I have this idea that I could stream any file over the house with a tablet or tablets, and this idea is kind of multi room stream with mix off hardware.
 what I test and is working..
             
..my two box running Linux Mint 17 with XBMC on each, but this is not necessary if you have one in on location and stream all your files to like the Py, only need to configure the XBMC to get the files from that machine and the same this for the tablet/tablets.

 Tablet 

My tablet that I test and is working ONDA V989 and the XBMC for android.

Mint 17 up and running open terminal and type
sudo apt-get install openssh-server
will ask for password


if this is the machine that you will have your files stored then go to network settings and write the IP Address something like 192.168.1.99


if you have other machine like me, then on that machine open Nemo..


when you make a connection to server form the client side, you only need
ex: /media/you name/
in my case the folder xbmc-hd is a 3 TB drive only for hd content, I have this set to
ex: /media/ricardo/xbmc-hd on XBMC client 
 this client is the box on my living room and tablet.

XBMC

 xbmc grate software open source and do everything as media center , setting up for remote stream..


you can see this error "could not connect to network server", your pc IP Address is wrong..


after all settings correctly applied it should look like this, however none of the files you see are there, this is Linux and you can make a text file ending in .mkv and add the cover!

PS: Please don't use this kind of tutorial for illegal things.  

All links that you see on this kind of tutorial go to original web pages and I don't my self scam people, thanks for read and stop by.

Thursday, 25 September 2014

How to install AMD driver 14.201.1008 in Mint 17!

Hi, this is very easy to do from Mint 17 but first let me tell a bit about my PC.

     Board - Gigabyte F2A88X-D3H
     CPU/APU - A4-6300
     Memory - Kingston HyperX 4 GB
     HDD - old from my Sony that the graphics broken will update to SSD.

My system info..


you can see Linux Mint 17
kernel - 3.13.0.24
AMD A4-6300
graphics HD8370D

Test and working with this hardware and kernel, if you have the same kernel and APU then go to the AMD website and download the driver 14.201.1008


and


and


after the download finish go to where you save it and extract,


you will have this folder fglrx-14.201.1008, inside you have ""amd-driver-installer-14.201.1008-x86.x86_64.run"" if click in that file you can run from terminal..

this now will run from terminal will ask for password and install..


reboot and then run in terminal the command
     ""fglrxinfo""
and you will have the same output of my snapshot.

    Mesa "error", underscan, Troubleshooting, Enabling Video Hardware Acceleration and more
refer to
            help.ubuntu.com

PS: if you have other fglrx driver on your system please remove with
   
sudo apt-get remove --purge fglrx fglrx-amdcccle fglrx-updates fglrx-amdcccle-updates
Thanks for take the time to read this post R Monteiro.

Sunday, 19 January 2014

Install Apps on Playbook from Linux

Hi, first and most hall my time one a pc is on linux mostly Mint so go back to Windows to install apps or sync music in itunes, this is no longer a good practice, I mean go back and forward. You could do this on a virtual machine, but if you don't have Windows it is not possible from virtual machine. Doing it from a browser Chrome / Firefox on Linux/Mac/Windows to manage yours apps on Playbook that is a good thing since the time we spend in front a pc is browsing.
So George J (jgc@gridbook.org) came with this idea tool that you can do this from a browser thumbs up. From Chrome the install takes a few minutes for full instructions follow http://gridbook.org/pb-app-mgr/ on this page, will give you the instructions based on your browser.
Apps that I have install using the tool/web soundcloud this in not a native app so you have to convert or download one with .bar @ http://apps.goodereader.com/apk-2-bar/, apps that I converted in windows and installed from was Nest, Yatse, Houzz, IMBD, and Unified Remote more or less they all work. Hope this help any of you.

Big Thanks to George J for this great tool.

Sunday, 1 December 2013

VirtualBox 4.3.4 VT-x error.

Hi, today when I start Windows in VirtualBox it display this error
Failed to open a session for the virtual machine W7.  VT-x is not available. (VERR_VMX_NO_VMX).  Result Code: NS_ERROR_FAILURE (0x80004005) Component: Console Interface: IConsole {8ab7c520-2442-4b66-8d74-4ff1e195d2b6}
I google this error and found this post on VirtualBox forum that solved the problem.
      https://forums.virtualbox.org/viewtopic.php?f=7&t=58826
But the command on that post is not complete...
VBoxManage modifyvm vmname longmode off
So mine virtual machine is called "W7"...
VBoxManage modifyvm w7 longmode off
 In terminal...

"VBoxManage: error: Could not find a registered machine named 'w7'
VBoxManage: error: Details: code VBOX_E_OBJECT_NOT_FOUND (0x80bb0001), component VirtualBox, interface IVirtualBox, callee nsISupports
VBoxManage: error: Context: "FindMachine(Bstr(a->argv[0]).raw(), machine.asOutParam())" at line 455 of file VBoxManageModifyVM.cpp"

you can see this error is because of the lower case, again in terminal...

VBoxManage modifyvm W7 longmode off
"VBoxManage: error: Invalid parameter 'longmode'"

but if added -- at the beginning of longmode it will work and solve the problem.
VBoxManage modifyvm W7 --longmode off
I hope this help some one.

Thursday, 31 October 2013

Get back Boot splash after install of Nvidia Driver.

My boot was a text displaying "Linux Mint 15" with 4 dot's on bottom and Nvidia logo after. I try install custom boot splash's but after reboot the same was displaying. The solution came after many attempts. My graphics Nvidia  Geforce 8400M GT, driver 310.44 linux 64 bit. This as taken from askubuntu.com last post...

First install hwinfo by running the following command:
sudo apt-get install v86d hwinfo
After the installation run the following command and note down the highest resolution:
sudo hwinfo --framebuffer
For me this was Mode 0x0361: 1280x800 (+5120), 24 bits, next edit the following file:
gksu gedit /etc/default/grub
This will open the GRUB config file, we now look for GRUB_CMDLINE_LINUX_DEFAULT="quiet splash" and change it with the following, change your resolution with mine and also add the color depth (for me 24 could be 16 or 32).
GRUB_CMDLINE_LINUX_DEFAULT="quiet splash nomodeset video=uvesafb:mode_option=1280x800-24,mtrr=3,scroll=ywrap"
Then find the following line (uncomment if needed) and change your resolution again, note that you don't include the color depth:
GRUB_GFXMODE=1280x800
Save and exit, next edit the following file:
gksu gedit /etc/initramfs-tools/modules
Scroll to the end of the file and add the following line, again add your resolution and the colordepth like you did before:
uvesafb mode_option=1280x800-24 mtrr=3 scroll=ywrap
Then in the terminal type the following commands and then reboot:
echo FRAMEBUFFER=y | sudo tee /etc/initramfs-tools/conf.d/splash
sudo update-grub
sudo update-initramfs -u
For me this fixed the problem, I tried all the other suggestions and scripts, none of them worked but this does, good luck!
To remove the Nvidia splash logo add "NoLogo" to xorg.conf, by
sudo gedit /etc/X11/xorg.conf

Section "Device"
     Option "NoLogo" "True"
Then you can install super-boot-manager to managing the boot splash.
My boot splash

Enriki-theme

I hope this help.

Thursday, 17 October 2013

Get back login sound in Linux Mint 15

For me this all ways been difficult to get back the login sound, after many attempts I fund this post on "community.linuxmint.com" and I get back my login sound.
          The process is by adding a command to the startup  applications...
Menu/Preferences/Startup Applications
or
Menu/ search...
if you don't have the Gnome Login Sound you have to add this by clicking on Add button.
 In there you have 
                              Name:
                              Command:
                              Comment:
for Name: add  GNOME Login Sound
for Command: add  paplay /usr/share/sounds/LinuxMint/stereo/desktop-login.ogg
for Comment: add  Plays a sound whenever you log in
the Comment field can be blank but the other two are important.
You can test this on terminal by run the Command: above, but this give the opportunity to us to add your own custom login sound, I hope this was help full to you like was to me.

Saturday, 28 September 2013

My Linux Mint 15 with Docky

Hi I have finish my Docky theme so this post is about my desktop Mint Cinnamon and Docky.
Docky theme can be download from Google Drive is a .tar file use Docky settings to install new themes, I did this Docky theme to go with Fiaence-Azur icon theme, Docky is the latest form PPA.
The badge,
The menu settings,
The wallpaper at DeviantART,
to remove the Docky icon from the dock, go to Menu, System tools,  Configuration Editor (gconf-editor) maybe you need install  gconf-editor, on the
Configuration Editor, click on apps, Docky, Items, DockyItem and untick
ShowDockyItem.
Restart Docky.
I hope this was informative.

Linux Mint
Docky PPA
gconf-editor
My wallpaper