Showing posts with label Tip. Show all posts

Wednesday, 1 October 2014

Cpufreq not show on panel Mint 17 a fix

Indicator-cpufreq on my Mint 17 is install and working but for some reason not show on Mint panel, see launchpad.net latest bugs reported.

            Until this bugs are fixed my fix..
 you can star it with
ALT+F2 and type  "indicator-cpufreq"

or

add a launcher in or desktop..


                                       ALT+F2 and type [indicator-cpufreq]


                           right click on your desktop and add a launcher


                             type the info for the launcher and add a icon


I hope this help.

Friday, 26 September 2014

Stream Your Files Over The House

Hi this is a kind of tutorial, some hardware, software is need for this "kind of tutorial".


      To begin let me tell about my set up, two box running Linux Mint 17 64bit, one on my living room and the other on my small room they are connected directly to my Thomson  wi-fi router with RJ45 cables with help of TP-LINK AV200+, on the living room side, together this two machines have 7 TB of HDD.

Things that you need for this "kind of tutorial"

            Linux Mint 17 or any other based in Ubuntu/Debian
            OpenSSH Client (install by default in Mint)
            OpenSSH Server
            XBMC 13.2            (Kodi from 14.0)
  
Ok I have this new board that was 8 Sata ports so I only need 1 box running and something like Raspberry  Py with Raspbian on the living room to stream to my TV.

Stream Your Files Over The House

 So I have this idea that I could stream any file over the house with a tablet or tablets, and this idea is kind of multi room stream with mix off hardware.
 what I test and is working..
             
..my two box running Linux Mint 17 with XBMC on each, but this is not necessary if you have one in on location and stream all your files to like the Py, only need to configure the XBMC to get the files from that machine and the same this for the tablet/tablets.

 Tablet 

My tablet that I test and is working ONDA V989 and the XBMC for android.

Mint 17 up and running open terminal and type
sudo apt-get install openssh-server
will ask for password


if this is the machine that you will have your files stored then go to network settings and write the IP Address something like 192.168.1.99


if you have other machine like me, then on that machine open Nemo..


when you make a connection to server form the client side, you only need
ex: /media/you name/
in my case the folder xbmc-hd is a 3 TB drive only for hd content, I have this set to
ex: /media/ricardo/xbmc-hd on XBMC client 
 this client is the box on my living room and tablet.

XBMC

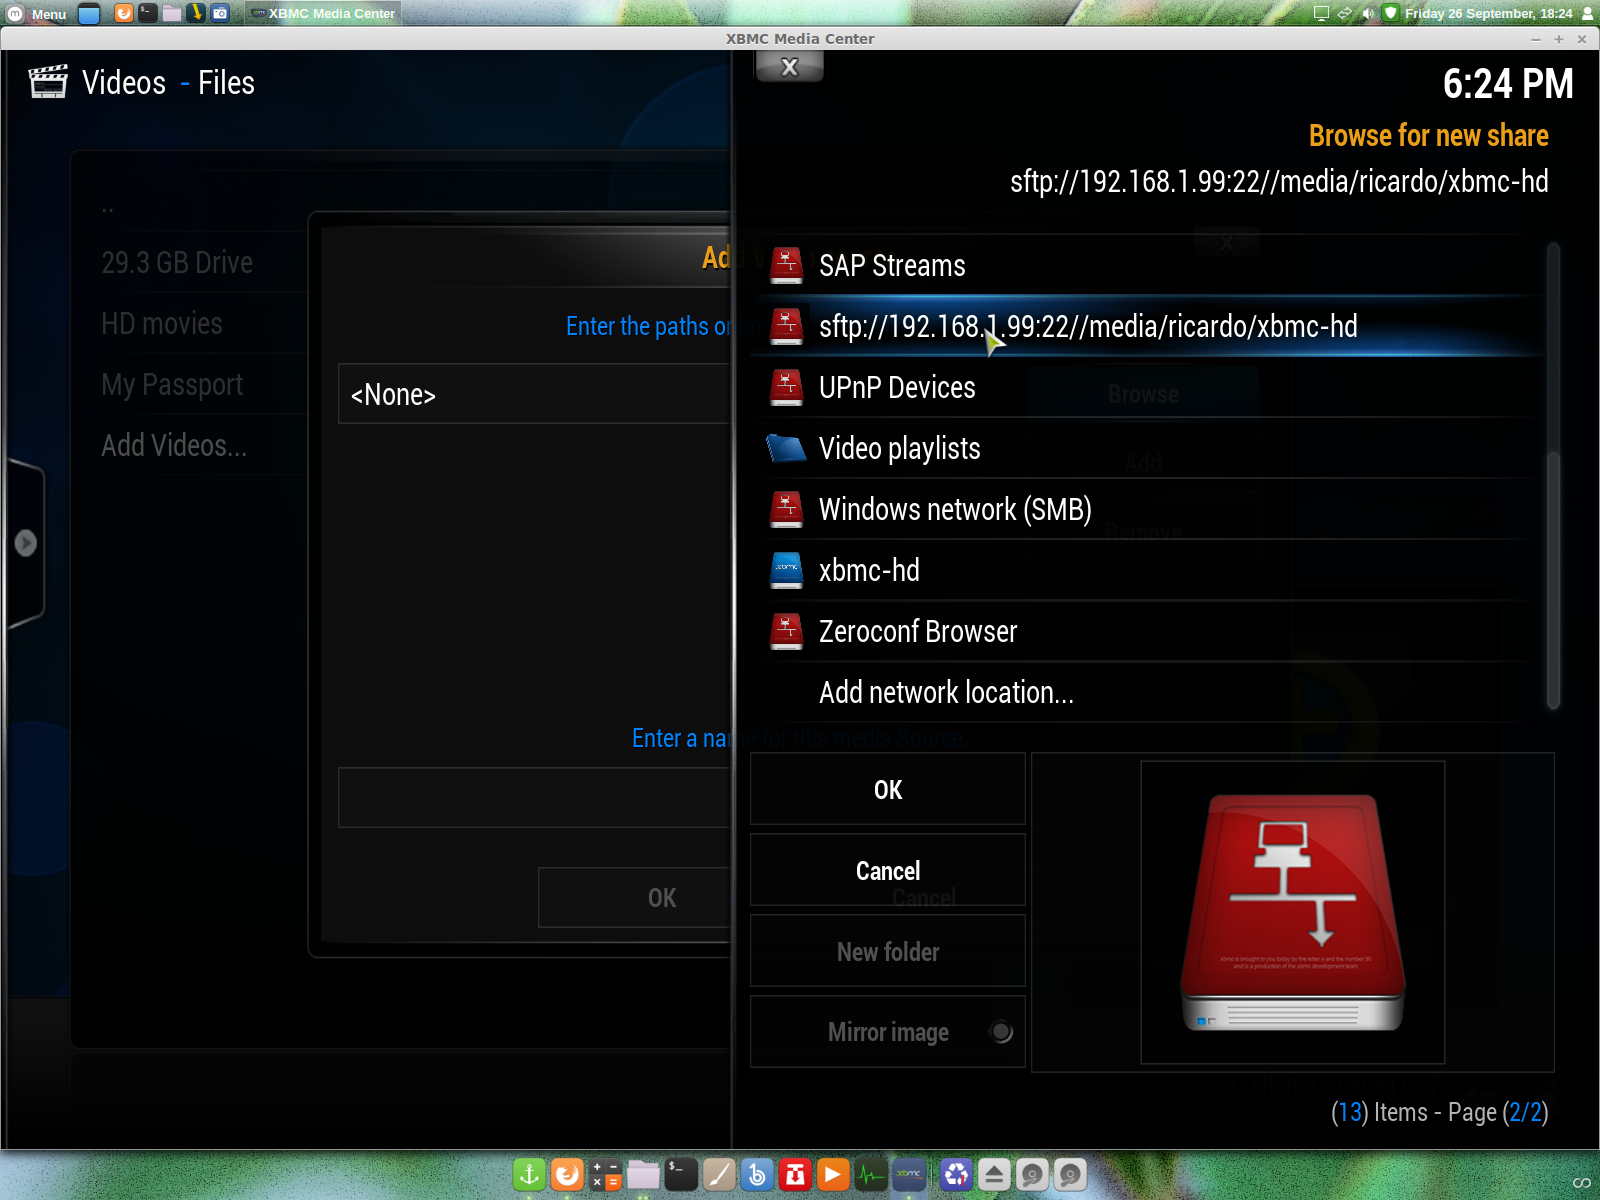
 xbmc grate software open source and do everything as media center , setting up for remote stream..


you can see this error "could not connect to network server", your pc IP Address is wrong..


after all settings correctly applied it should look like this, however none of the files you see are there, this is Linux and you can make a text file ending in .mkv and add the cover!

PS: Please don't use this kind of tutorial for illegal things.  

All links that you see on this kind of tutorial go to original web pages and I don't my self scam people, thanks for read and stop by.

Thursday, 25 September 2014

How to install AMD driver 14.201.1008 in Mint 17!

Hi, this is very easy to do from Mint 17 but first let me tell a bit about my PC.

     Board - Gigabyte F2A88X-D3H
     CPU/APU - A4-6300
     Memory - Kingston HyperX 4 GB
     HDD - old from my Sony that the graphics broken will update to SSD.

My system info..


you can see Linux Mint 17
kernel - 3.13.0.24
AMD A4-6300
graphics HD8370D

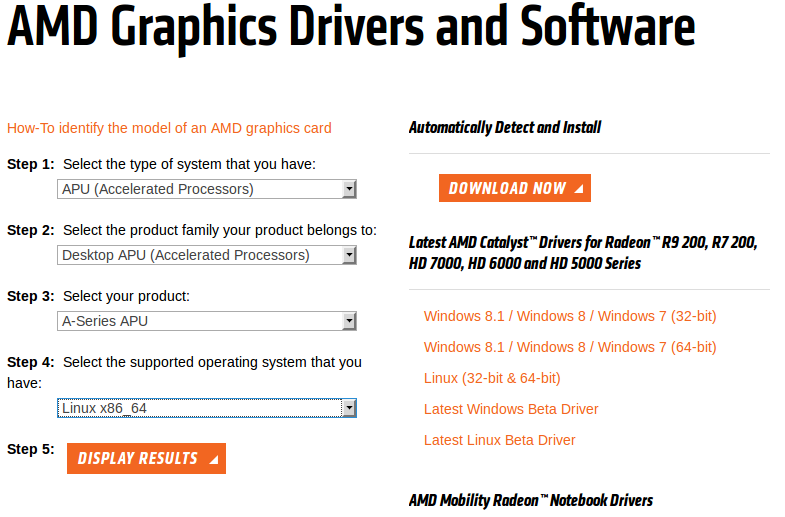
Test and working with this hardware and kernel, if you have the same kernel and APU then go to the AMD website and download the driver 14.201.1008


and


and


after the download finish go to where you save it and extract,


you will have this folder fglrx-14.201.1008, inside you have ""amd-driver-installer-14.201.1008-x86.x86_64.run"" if click in that file you can run from terminal..

this now will run from terminal will ask for password and install..


reboot and then run in terminal the command
     ""fglrxinfo""
and you will have the same output of my snapshot.

    Mesa "error", underscan, Troubleshooting, Enabling Video Hardware Acceleration and more
refer to
            help.ubuntu.com

PS: if you have other fglrx driver on your system please remove with
   
sudo apt-get remove --purge fglrx fglrx-amdcccle fglrx-updates fglrx-amdcccle-updates
Thanks for take the time to read this post R Monteiro.

Sunday, 1 December 2013

VirtualBox 4.3.4 VT-x error.

Hi, today when I start Windows in VirtualBox it display this error
Failed to open a session for the virtual machine W7.  VT-x is not available. (VERR_VMX_NO_VMX).  Result Code: NS_ERROR_FAILURE (0x80004005) Component: Console Interface: IConsole {8ab7c520-2442-4b66-8d74-4ff1e195d2b6}
I google this error and found this post on VirtualBox forum that solved the problem.
      https://forums.virtualbox.org/viewtopic.php?f=7&t=58826
But the command on that post is not complete...
VBoxManage modifyvm vmname longmode off
So mine virtual machine is called "W7"...
VBoxManage modifyvm w7 longmode off
 In terminal...

"VBoxManage: error: Could not find a registered machine named 'w7'
VBoxManage: error: Details: code VBOX_E_OBJECT_NOT_FOUND (0x80bb0001), component VirtualBox, interface IVirtualBox, callee nsISupports
VBoxManage: error: Context: "FindMachine(Bstr(a->argv[0]).raw(), machine.asOutParam())" at line 455 of file VBoxManageModifyVM.cpp"

you can see this error is because of the lower case, again in terminal...

VBoxManage modifyvm W7 longmode off
"VBoxManage: error: Invalid parameter 'longmode'"

but if added -- at the beginning of longmode it will work and solve the problem.
VBoxManage modifyvm W7 --longmode off
I hope this help some one.

Thursday, 17 October 2013

Get back login sound in Linux Mint 15

For me this all ways been difficult to get back the login sound, after many attempts I fund this post on "community.linuxmint.com" and I get back my login sound.
          The process is by adding a command to the startup  applications...
Menu/Preferences/Startup Applications
or
Menu/ search...
if you don't have the Gnome Login Sound you have to add this by clicking on Add button.
 In there you have 
                              Name:
                              Command:
                              Comment:
for Name: add  GNOME Login Sound
for Command: add  paplay /usr/share/sounds/LinuxMint/stereo/desktop-login.ogg
for Comment: add  Plays a sound whenever you log in
the Comment field can be blank but the other two are important.
You can test this on terminal by run the Command: above, but this give the opportunity to us to add your own custom login sound, I hope this was help full to you like was to me.

Saturday, 28 September 2013

My Linux Mint 15 with Docky

Hi I have finish my Docky theme so this post is about my desktop Mint Cinnamon and Docky.
Docky theme can be download from Google Drive is a .tar file use Docky settings to install new themes, I did this Docky theme to go with Fiaence-Azur icon theme, Docky is the latest form PPA.
The badge,
The menu settings,
The wallpaper at DeviantART,
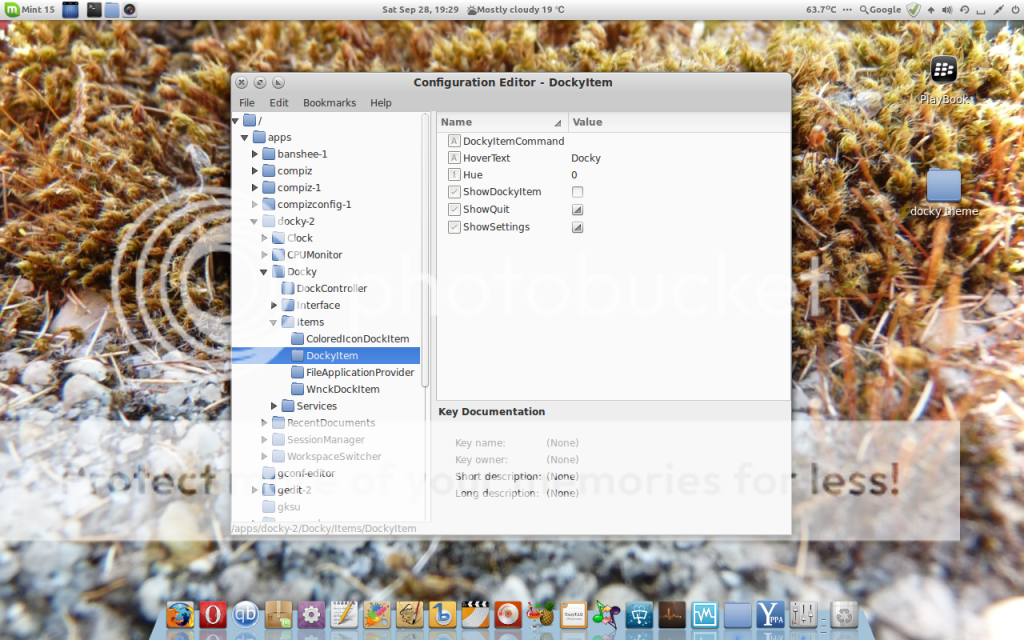
to remove the Docky icon from the dock, go to Menu, System tools,  Configuration Editor (gconf-editor) maybe you need install  gconf-editor, on the
Configuration Editor, click on apps, Docky, Items, DockyItem and untick
ShowDockyItem.
Restart Docky.
I hope this was informative.

Linux Mint
Docky PPA
gconf-editor
My wallpaper

Sunday, 22 September 2013

Y PPA Manager: Easily Search, Add, Remove Or Purge PPAs

This is a extraction of the software makers...
Y PPA Manager is a project I've been working on for a couple of weeks for easily managing and finding Launchpad PPAs in Ubuntu. Y PPA Manager is a tool for easily managing Launchpad PPAs that uses YAD for a graphical user interface (a Zenity fork which comes with a lot of improvements) and comes as a .deb and with a Launchpad PPA for easy updates. Please note that this is a pre-alpha release as I'm the only one who's ever used Y PPA Manager so far.

Y PPA Manager features (in this first release):

  • Add PPA
  • Delete PPA - displays all the enabled PPAs (disabled PPAs will not be listed) and you can delete any PPA from that list
  • Purge PPA - uses the "ppa-purge" tool to downgrade the packages in the selected PPA to the version in the official Ubuntu repositories and disables that PPA
  • List packages in a PPA enabled on your computer - lists all the packages that are available for your Ubuntu version in the selected PPA (only PPAs that you have added to your system and are enabled will show up here)
  • Search in all Launchpad PPAs - will perform a search in all the Launchpad PPAs for the package you enter in the search form. The search uses the Launchpad PPA search so it may return empty PPAs if the PPAs have a description that matches your search, or a PPA with packages for a different Ubuntu version then your current Ubuntu version (or the Ubuntu version you've set Y PPA Manager to search for - see info regarding the settings below). You will be able to perform the following operations on a PPA: add it, list all the packages in that PPA for your Ubuntu version (or the Ubuntu version you've set Y PPA Manager to search for in the settings) - including the package versions, download selected packages from a PPA, copy PPA link (so you can then paste it in a web browser).
  • Settings - there is no GUI option for this yet. But you can modify a few settings by editing the /etc/y-ppa-manager.conf file (you'll find info on the possible settings inside that file). Options include: setting the Ubuntu version for the "Search all Launchpad PPAs" feature, setting the PPA-Purge behavior (automatic - the user will not be prompted; manual: a terminal window will open asking the user what to do from the available list of options in aptitude) and setting the PPA .deb download path.


Y PPA Manager Search
(Searching for "vlc" using Y PPA Manager")

While most of the features are wrappers for some command line tools (Add PPA uses "add-apt-repository", Purge PPA uses "ppa-purge"), there is one feature you won't find in any other Desktop tool: the search feature. There is a search tool for Launchpad PPAs but it did not display the packages in the PPA it finds - Y PPA Manager on the other hand can display all the packages in a PPA that come up in the search results, along with their versions. You will then be able to add that PPA, download some .deb files from it or copy its link.

Y PPA Manager
(Packages in a PPA)


It's nothing major but there wasn't a tool for performing all these operations in the same GUI, this being the reason why I'm launching Y PPA Manager.

Y PPA Manager is of course not perfect since there are a lot of limitations to both bash and YAD, but I don't know any "real" programing languages. I've wrote it for my own use and to learn a few things but as usual I wanted to share it.


Y PPA Manager only works with Launchpad PPAs (so it won't work for other 3rd party repositorties) and Ubuntu!

Install Y PPA Manager

Y PPA Manager should work on Ubuntu Karmic, Lucid, Maverick and Natty so there are packages available for all these Ubuntu versions. However, please note that I've only tested it on Ubuntu Lucid and Maverick (32 bit).

To add the Y PPA Manager PPA and install it, use the following commands:
sudo add-apt-repository ppa:webupd8team/y-ppa-manager
sudo apt-get update
sudo apt-get install y-ppa-manager

Once installed, you can find Y PPA Manager under Applications > System Tools.

Via webupd8.org

I  still prefer input the above command in terminal but this is a easy option to add a new PPA. You need lunch it and type the name of PPA , using the above PPA will be "ppa:webupd8team/y-ppa-manager"

Monday, 21 May 2012

3 D top/bottom to 2 D in Avidemux

Hi, recently I been ask if the process of 3 D top/bottom as the same to side by side my answer was yes but  I thought make a post about it.
I've grabbed  a trailer like this, http://www.youtube.com/watch?v=WMpHgdG4VC8&feature=related
and see who that end.
 the system is Ubuntu 12.04LTS and Avidemux 2.5.4 64bit,
after imported the video file to Avidemux, 2 motion pictures 
 filters under video tab, first crop
 the crop preview 
 the green area is what will be cut off
 after crop you will end up this preview
 resize filter use avisynth to bring back to the size of 1920x1080
 this trailer is 1920x1080 after crop is 1920x400
with  resize filter will ebd up in 1920x1080

 video filter tab crop and resize
 the resize (1920x1080) preview
 finally re-encode this trailer.
trailer:  The Pirates! Band of Misfits
Ubuntu:  http://www.ubuntu.com/download
Avidemux: Avidemux
other posts: http://insideofasmallbox.blogspot.co.uk/2010/12/encode-3-d-to-2-d-in-avidemux.html